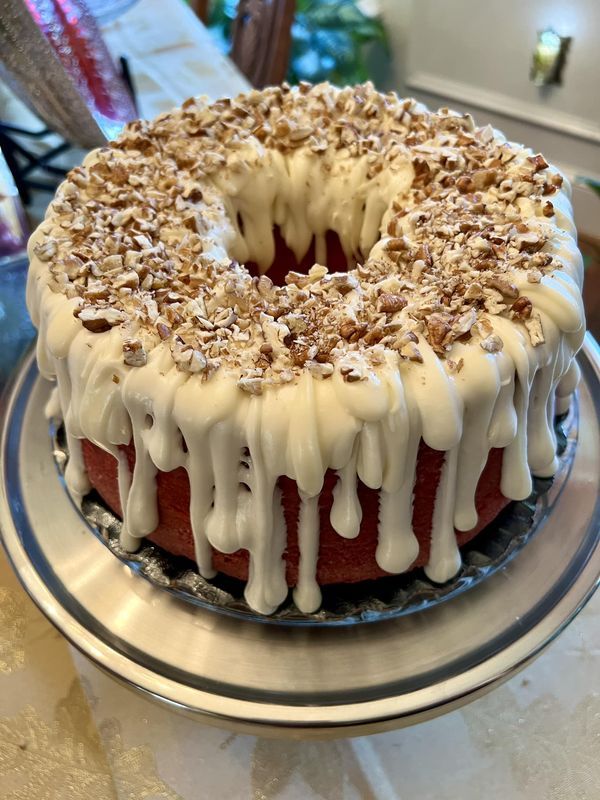
This recipe yields a moist, vibrant red cake with a velvety crumb, topped with a signature cascading cream cheese frosting and crunchy pecans.
Ingredients
For the Cake:
- All-purpose Flour: 2.5 cups
- Granulated Sugar: 1.5 cups
- Unsweetened Cocoa Powder: 2 tablespoons
- Baking Soda: 1 teaspoon
- Salt: ½ teaspoon
- Buttermilk: 1 cup (room temperature)
- Vegetable Oil: 1 cup
- Eggs: 2 large (room temperature)
- White Vinegar: 1 teaspoon
- Vanilla Extract: 1 teaspoon
- Red Food Coloring: 1 to 2 tablespoons (liquid or gel)
For the Cream Cheese Glaze:
- Cream Cheese: 8 oz (softened)
- Unsalted Butter: 4 tablespoons (softened)
- Powdered Sugar (Icing Sugar): 2 cups
- Vanilla Extract: 1 teaspoon
- Milk: 1-2 tablespoons (to adjust consistency)
- Topping: ½ cup chopped pecans or walnuts
Instructions
1. Preparation
Preheat your oven to 350°F (175°C). Generously grease a 10-inch Bundt pan with butter or non-stick spray and lightly dust it with flour, tapping out any excess.
2. Mix Dry Ingredients
In a medium bowl, whisk together the flour, cocoa powder, baking soda, and salt. Sift these ingredients to ensure there are no lumps, which is crucial for a smooth “velvet” texture.
3. Mix Wet Ingredients
In a large mixing bowl, beat the sugar and vegetable oil until combined. Add the eggs one at a time, beating well after each addition. Stir in the buttermilk, vanilla extract, red food coloring, and vinegar until the color is uniform.
4. Combine
Gradually add the dry ingredients into the wet mixture. Mix on low speed or by hand just until combined. Do not overmix, as this can make the cake tough.
5. Bake
Pour the batter into the prepared Bundt pan. Bake for 45 to 55 minutes. To check if it’s done, insert a toothpick into the center; if it comes out clean, the cake is ready.
6. Cooling
Let the cake cool in the pan for about 15 minutes. Carefully run a knife around the edges and the center tube, then invert the cake onto a wire rack to cool completely.
7. Make the Glaze
In a small bowl, beat the softened cream cheese and butter until smooth. Add the powdered sugar and vanilla, mixing until creamy. Add milk one tablespoon at a time until the frosting is thick enough to hold its shape but thin enough to “drip” down the sides.
8. Final Touch
Once the cake is completely cool, pour the glazeover the top, letting it naturally run down the grooves. Immediately sprinkle the chopped pecans over the wet glaze so they stick.
1. The Science of the “Velvet” Texture
What makes Red Velvet different from a regular chocolate cake is the chemical reaction.
- The Cocoa & Acid Reaction: Traditional Red Velvet relies on the reaction between acidic buttermilk, vinegar, and cocoa powder. This creates a fine, tight crumb that feels like “velvet” on the tongue.
- Color Tip: If you want a deep, professional burgundy color, use Gel Food Coloring rather than liquid. Gel provides a vibrant hue without thinning out the batter.
2. Mastering the “Drip” Effect (Frosting Technique)
The frosting in your photo is a thick pourable glaze, not a stiff buttercream.
- The Secret Ratio: For that perfect “slow-motion” drip, your cream cheese must be at room temperature. If it’s cold, the glaze will be lumpy.
- The Test: Take a spoonful of glaze and drop it back into the bowl. It should disappear back into the mix in about 3-5 seconds.
- Too thick? Add 1 teaspoon of milk.
- Too thin? Add 2 tablespoons of powdered sugar.
- Application: Use a measuring cup with a spout or a large spoon. Pour onto the highest point of the cake and let gravity do the work.
3. Pro-Level Toppings & Finishing
- Toasting the Nuts: Before chopping the pecans or walnuts, toast them in a dry pan for 2-3 minutes. This releases the oils and makes them much crunchier, providing a better contrast to the soft cake.
- Immediate Application: Sprinkle the nuts immediately after glazing. Once the cream cheese glaze sets (dries), the nuts will just roll off.